Background

Tuesday, February 11, 2014

Dealing with Digital Images Part 3


I have at least 30 boxes of old photos in my house.  Most of them are jumbled in no particular order as they were collected when moving older relatives.  I feel a great responsibility in being the caretaker of this family history.  If you are familiar with older photos, you know that some are yellow looking, some seem to be cracking or peeling, and others are so brittle that they are falling apart.  These conditions are all due to the chemicals used in the development process and in the paper.  There is no way to reverse these processes, so the best way to save the image is to scan it and make it into a digital image.  There are many ways to accomplish this:

  • Many people (including me) have a 3-in-1 or 4-in-1 printer that has a scanning bed.  Make sure that the glass is clean to avoid spots and then scan the photo.  If you are given a choice about quality, always choose the highest.  Image quality is described as "dots per inch" or DPI.  You want at least a 300 DPI.  600 DPI is my choice if I have the option.
  • You can hire someone who owns a high speed scanner or rent the scanner.  If you are interested in this option, I recommend looking for an Heritage Makers consultant in your area.  Many own these high speed scanners.  There is usually a per image charge of about $.29.  I had the opportunity to rent a scanner a few years ago and scanned over a thousand photos for just $50.00.  I wish I had done a lot more!
  • There are companies everywhere that will scan photos.  ScanCafe is one such business where you can mail them your photos and they will digitize them.  Although they have better pricing if you are scanning large quantities, you have to balance the risk of putting your photos in the mail.  Look in your area for a local scanning company before you ship your photos away.
  • For large photos you may have good success with making a photograph of it.  You will have to adjust your camera's settings until you get a usable image.   
Once you have your photos digitized, you need to organize them in a similar manner to your digital photos.  This is much more difficult with older photos that were scanned in no particular order, but you can set up folders by decades and drag and drop the photos one at a time into the folders.  It may help to also label the family name such as "Foster 1950s".  You may choose to label the photos by name such as "Gram Collins ". If you have a lot of time you could rename the files to indicate who is in the photo.  Future generations will know even less than you do, so save what you know.  Labeling is important!

Once your photos are organized, you need to DO something with them.  The simplest thing is to print the photos and display them in frames, but that can turn into clutter in a hurry.  Canvases have become very popular of late and that is a great way to preserve a really special photo.

You may choose to make scrapbooks- either using traditional paper methods or digital scrapbooking methods.  One of my favorite techniques is to drop the photos into a pre-made book template.  Shutterfly and Costco make books at great prices, although I have heard complaints about the quality of the books.  I use Heritage Makers.  There are thousands of templates so that each book can have its own "feel."  I have made books about trips, individual people, family recipes, and year in review retrospectives.   

Since digital files are so easy to share, make sure that you share with your family.  Since there may only be one photo of great-great grandpa, make sure that everyone has a copy!  You can use CDs to share photos, but caution family members to back them up in safer methods.

Dealing with Digital Images Part 2

This is a really important topic and there are lots of good ways to deal with your photos, but in my experience most people don't do any of them.  My opinion is that my photos are priceless, so it is worth it to me to invest in the products and services that will protect them.  

Burning your photos to a CD is NOT RECOMMENDED!  CDs deteriorate over time and can be completely worthless in as little as five years.  If they get scratched or damaged, your data is GONE.  Do not use CDs except to share photos.  They are not a storage device.

If you have downloaded your photos, they are saved on your hard drive.  Although a hard drive is a great thing, they do break down and that can be catastrophic if you don’t have a back up.  You need to have at least one method of back up and I would suggest two or three. Here are some ideas for back ups:
  •  Add another drive to your computer.  I have two drives in mine and I save my current photos on both. 
  • Use an external hard drive.  These usually look like a small black box and all they do is serve as memory.  You can get a Terrabyte of memory for under $100 on Amazon.  For most people this will save several years of photos.  You can set up your computer to automatically update your external hard drive or you can manually save to it on a regular basis.  (Note: These new viruses and malware that have been going around recently don’t only attack your computer- they attack anything attached to it, so that could put your EHD at risk.)  I have no problems with thumb drives- as long as you have a safe place to keep them.  It might be a great idea to keep a set of thumb drives or EHD off site in case of a fire or flood.  If you are a “mad photographer” like I am, the thumb drives would cost a LOT more than a good EHD.
  •  Subscribe to an automatic online back-up service such as Mozy or Carbonite.  These companies can make automatic back-ups of your computer on a regular basis (nightly, weekly).  Although these services can be expensive, they are also wonderful when your computer crashes because it is very easy to download the missing files from the company and they work on a schedule so you don’t have to remember to do anything.  Mozy has been a lifesaver for me in the past and one of my friends swears by Carbonite.  There are some new providers in this category but I have no experience with them.
  • Use an online photo service to organize and save your photos.  Flickr, Picasa, and Shutterfly are popular sites.  As long as you upload your photos to the cloud right away, you will have a safe back up that you can also set up to be shared with those people you choose.  You need to make sure that you can download full-resolution images from the site if you are using it as a back up.  I upload my “commercial” photos to SmugMug.  It is a little more difficult to navigate than the others, but it also gives me greater control for a reasonable price.
  •  If you don’t care about having “Photo” type options and you just need to save the files, you might want to look into sites like Dropbox, GoogleDrive, or SkyDrive
My recommendations:
  • If you are lazy or forgetful and you are pretty sure that you won’t remember to back up, you should use an automatic on-line back up service.  At least once a year you should copy all your photos to an external hard drive. 
  • If you are pretty organized, schedule one day a month to upload photos to an online site and transfer them to your EHD.  Do NOT delete the photos off your photo card until they are backed up and do NOT keep your EHD attached to the computer.
  • If you are a maven of organization, do it all at the same time.  Download photos to your hard drive, copy them to an EHD (that does not stay plugged in), and upload them to a cloud storage site.  Once they are asved in three places, you are probably safe.

I tend to be in the middle category because I have to edit my photos, so I make sure that I have back ups of the originals during the editing process.  Last summer I lost the originals of a wedding.  Once burned, twice shy.

NOTE:  When you are transferring photos, make sure that you COPY them to the new location.  Do NOT use a CUT and PASTE technique.  You can go back and delete them later if you want to- AFTER you make sure that they are where they are supposed to be!

Tomorrow I'll cover how to deal with old photos and give you some ideas about how to get your photos off the computer and into your life!


Dealing with Digital Images Part 1

A good friend of mine had a glitch the other day while moving around some digital photos and lost them.  That is just about the worst feeling in the world!  These days we are all using digital cameras.  We have photos on our phones.  But apparently not everyone knows what to do next. I keep hearing about people just keep buying more memory cards because they are afraid to download their photos!  Pictures are no fun when they are on a memory card.  They need to be displayed and seen! 

I am pretty passionate about photography and memory keeping.  I come from families that took LOTS of photos.  Now that I am the guardian of all the family photos I have a whole room in my basement filled with boxes of loose photos and photo albums.  Although these are a treasure trove of memories, they take up a lot of space, they are hard to enjoy, and they are hard to share.  Now we have all gone digital.  I take a couple thousand photos a month with my Canon 7D.  I also have a Canon Power Shot that I carry when I need to just grab a couple of snapshots.  And then there is the phone.  Sometimes my iPhone is the only camera available to take a photo of a really important moment.

So. . . how do we deal with all these photos?  What is the best way to preserve our memories?

This three part series will cover Downloading and Organizing Your Digital Photos, Storing and Backing Up Your Digital Photos, and Preserving Old Family Photos/Using your Photos.  For the sake of this tutorial I will assume that you are using a Windows based computer and that you are just taking regular old photos (not RAW).

The Download

Your computer may have a slot where you can insert your memory card and download the photos to your hard drive.

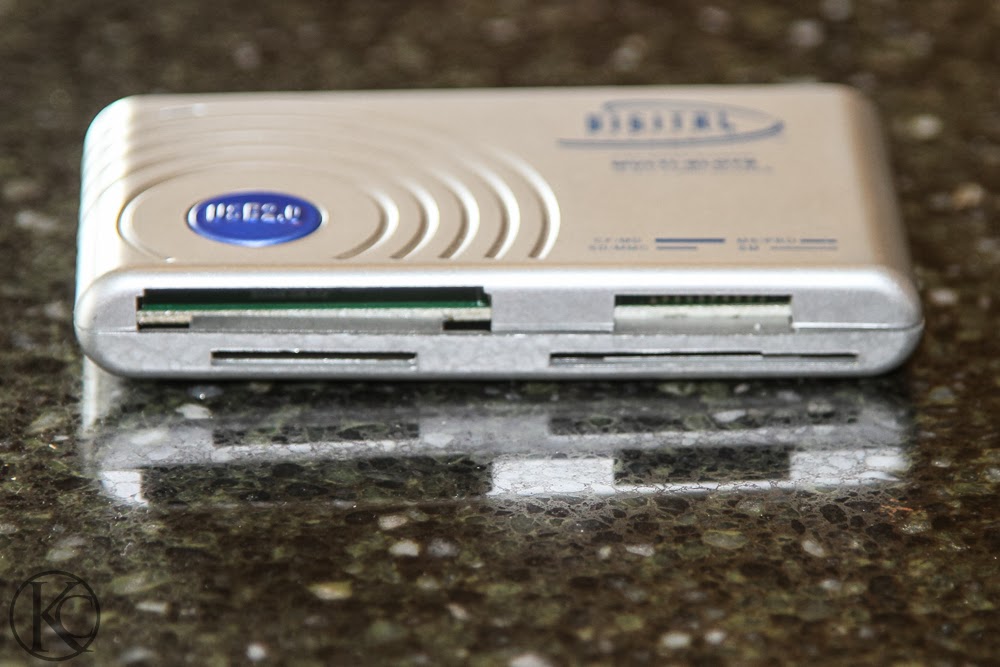
If not, you need to purchase a card reader.  The photo below is the one I use. 
I need to read CF cards and SD cards so this one is perfect for me.  They are inexpensive (under $20) and they use a USB port to attach to your computer.  As soon as you attach to the computer you will probably have a box pop up asking what you want to do.  If not, you can click on the Start Button (the circle in the lower left hand corner), then on Computer, and then find the drive that you are using.  Mine show up under hard drives or removable storage.  Click on that icon and then you will be able to transfer the photos. 
If you can plug your phone into your computer, it will usually prompt you to make a file of your photos.  You should do this every few months.  Otherwise, you will need to e-mail your photos to yourself to get them onto your computer so that you can save them.  This will take a lot longer, but if the photos are good, it is worth it.

Organizing Your Photos

It doesn’t really matter HOW you organize your photos as long as you are consistent.  I have always organized my photos by date.  I make a folder for the year and then a folder for each month.  A trick to naming these folders is to use the number of the month, for example “1 January 2014”, “2 February 2014”.  The reason that I do this is that it keeps the months in order.  If you just use the name of the month, the computer will arrange them alphabetically.  Inside those month folders I have event folders that tell me what the photos are, such as “Colby Graduation” or “Trip to Maine”.  This system has worked very well for me for many years.  Even if there were two events on the same day, I will generally separate the photos into different event folders- not just by date. 

NOTE- If you have a photo editing program such as Adobe’s Lightroom, you need to make sure that you understand how to use the program to organize your photos and you should always move photos INSIDE the program so that you don’t lose links.

My organizational tree would looks something like this:
         2013
              1 January 2013
                        New Year’s Day
                        WrestlingAF
                        Lewis and Clark
                        Birthday Party
             2 February 2013
                        Tibble Fork

                        Valentines

Come back tomorrow for Part Two: Storing and Backing Up Your Photos

Monday, February 10, 2014

Sweet Valentine's Day Printable

I have decided to really tone down my decorating in 2014.  We have had a rough run for a few months- including me having a hernia surgery a couple of weeks before Christmas.  That experience helped me realize that my family does not really care if the house is decorated- they only care about the decorations that have become a tradition.  For us that is a Christmas Tree and lights in the windows for the whole holiday season.  So. . . despite the fact that I have a whole tub of valentine decorations in the garage, I'm sticking to one printable that I can slide into my chalkboard display stand.  The best part?  I can change it out easily for each holiday so that I don't feel like a total Scrooge!

This printable is sized for a normal piece of paper 8.5" x 11".


Tuesday, October 15, 2013

Cranial Sacral Therapy

Some people will think I am a total nut, but I have a friend who is a healer.  Had she been born in the 1600's and lived in Salem, she probably would have been hung.  She is by trade a massage therapist but has branched out into Cranial Sacral Therapy.  She is trained and certified.

A couple of years ago I went to her because I was having headaches.  CS Therapy involves a light touch on the body- very non-invasive.  As her hands drifted by my ankle she asked if it hurt. I told her it was a little sore since I had twisted it the previous week.  She "released" it and said it would find a way to exit my body.  It came out my ear.  Weirdest thing ever.  It hurt like heck for about 10 seconds and then my ear and my ankle were fine.

The Therapist agreed to come to my house to work on The Boy. He is 17 and had a massive knee surgery. She sat on the couch and held his bad leg while carrying on a conversation with us.  She said it was pulsing, but The Boy didn't notice anything.  He was relaxing, though.  Then she went to his good leg, explaining that the good leg was now doing a lot more work.  As soon as her second hand touched his leg, he startled and almost yelled, "Can you feel that?"  She smiled and asked him what he was feeling.  He said that it felt like his muscles were untwisting.  She responded that she was feeling the same thing.  After just a couple of minutes he looked over at me and told me that his pain was at a 1.  For the first time since the surgery.  And that he wanted to sleep.  For the first time since the surgery.  (Narcotics make The Boy crazy. . . not sleepy.)  He drifted off to sleep and she sat and touched his legs until they were calm- whatever that means.

After that first experience The Boy was a believer and asked me to call her when things got rough.  I think it has made all the difference in his healing because it relieved his pain and helped him sleep.  He also said that he felt stronger afterwards- which was evident in his movements.

All I can say is that this therapy is wonderful- as long as you have a healer!  Give it a try.


Essential Oils for Knee Surgery Relief

My son had knee surgery three weeks ago and it was an extensive surgery- complete with scraped cartilage, a new tendon made out of his hamstring, and his tibia broken and screwed together.  This boy of mine HATES taking medicine. . .especially anything that blurs his mind.  Since this is not our first rodeo on the knee surgery front (he had one last November for a totally different problem) I decided to look for some alternate therapies.

I have not been a proponent of Essential Oils, but I figured that it couldn’t hurt.  I bought the following oils from Spark Naturals and made up the recipe after a bit of research.

5 drops Cypress (regulates blood flow, calms)
5 drops Birch (relieves pain in muscles, bones, and joints, promotes bone repair)
5 drops White Fir (relaxes muscles, aids natural defenses, anti-inflammatory)
3 drops Lemongrass (relieves tension, promotes ligament health)
10 drops Wintergreen (relieves pain and spasms)
1 teaspoon Extra Virgin Coconut Oil (skin healing properties, carrier oil)

I mixed these oils together and stored them in a small container.  It is pretty easy to make a batch because the Spark Natural bottles all have a dropper top, so I wasn’t worried about quantity.  At first I could only get to the boy’s foot, so I put it on both feet (the arch and under the toes) at least three times a day.  As the bandages shrunk, I got closer and closer to his knee until I was going right around the steri strips.  He said that it really helped with his pain and would sometimes ask me to put it on.  He was off the narcotics on day 5 which really surprised his doctor (who had prescribed 90 Percocets and 10 Oxicodones) and off Advil on day 10.

Now we are at day 21 and he still has some swelling, but not much pain.  He has three large scars and two smaller ones that I would like to minimize, so now I am trying something new- an EO balm that he can apply anytime.  Here’s the new recipe:

10 drops Tea Tree (skin healing properties)
15 drops Birch(bone growth)
15 drops Lavender (skin healing properties)
15 drops White Fir (anti-inflammatory)
30 drops Wintergreen (pain)
1 teaspoon (scant) Extra Virgin Coconut Oil (skin healing oils)
½ teaspoon beeswax (product hardener)
½ teaspoon cocoa butter (skin softening, product hardener)


This made enough to fill two chapstick-type containers.  The boy can apply it directly to the scars to promote healing and alleviate itching.  It is easy for him to keep with him and he even likes the smell!

Friday, January 4, 2013

Cupcakes. . . In a hurry!


Yesterday at 3:00pm I got a paniced phone call from my best friend.  Our local Costco had a fire and was closed.  As far as Di and I are concerned, Costco is the center of the universe, so this was quite a blow.  Her daughter's 18th birthday was yesterday and she was planning to just go to Costco to buy the cake, but her plans were dashed.  Her plan was that she would go home and make the cupcakes if I would come frost them because she is convinced that she can't do that type of thing.  I looked at the clock and knew it was hopeless.  Not because of her plan, but because her job is like a black hole with its own gravitational force.  (She is the receptionist at my husband's business!)  I told her not to worry- we would handle it.

My oldest son was lurking, so I set him loose making the cupcakes.  We used regular cake mixes, but my secret is to add an extra egg.  I think it makes the cupcakes a little richer AND helps me use the eggs that my chickens so graciously produce!  Our chocolate batter was really runny, so we added a 1/4 cup of flour and they came out perfect!


I love the pretty cupcake papers that you can find everywhere, but I have become somewhat disillusioned with them over the past year.  Some of them turn downright ugly after having a cupcake cooked in them and some just don't hold up very well.  I noticed that my local cupcake shop used souffle cups, so I had to have some.  I bought mine at Orson Gygi in Salt Lake City.


If you need 5000 (Are you nuts or do you have friends that want to share?) you can buy them here for about $.02 a piece.

http://www.amazon.com/Solo-550-2050-Pleated-Souffle-Capacity/dp/B0040ZOWAA/ref=sr_1_7?ie=UTF8&qid=1357317105&sr=8-7&keywords=5+oz++paper+souffle+cups

Or you can buy 250 for $7.50 which is only $.03 a piece.  Even with shipping and handling these are WAY cheaper than the pretty ones in the grocery store.

http://www.amazon.com/Solo-SCC550-Paper-Souffle-Portion/dp/B005HJ08O2/ref=sr_1_sc_2?s=industrial&ie=UTF8&qid=1357317480&sr=1-2-spell&keywords=soslo+550


Only fill the cups about 1/3 full- you want some head space when they are cooked.  We cooked the little critters for 15 minutes and they were great.


I made buttercream frosting.  I am one of those dump and pour cooks, so I can't give you my recipe, but I use butter, cream, vanilla, and confectioner's sugar. I tinted it purple with Wilson's gel.  I ALWAYS use a frosting bag and tip to frost cupcakes.


 I think it is easy and it sure looks more professional than slopping on some frosting with a knife.  I used a Wilton 1 M tip and a large 16" pastry bag. 

This bag is too big to drape over a glass, so I use a pitcher.  It is like having an assistant.  A good squeeze and a circular motion will give you great looking cupcakes.


At 4:20 I left my house to deliver the cupcakes.  Disaster averted!  Now . . . I hope Costco re-opens today.


Wednesday, January 2, 2013

A Little at a Time

Do you ever feel like just throwing in the towel because there is just so much to do?  I know that I get overwhelmed sometimes (often) and don't make time to keep things orderly.  Then I get stressed because the house is a mess and I can't find anything!

One day my friend Joan taught me her trick for staying sane and keeping the house "a house of order."  It's so easy and yet, so hard!!!  But here is the rule:

One drawer a day.
 
I bet you thought it was going to be something glamourous, huh?  Nope.  Just take a few minutes every day to organize one drawer.  Or one cabinet.  Or one shelf in the cabinet.  The real point here is to just do a little.  If it takes you longer than 15 minutes, then it's probably too big a job because it will make you want to skip the next day.
 
The FlyLady wants us to declutter for 15 minutes a day.  Once you get truly decluttered then keeping the house clean is supposedly a snap.  I struggle with getting rid of things that I might need. . . someday.  I live by the mantra "When in doubt, throw it out," but we still have clutter.
 
The clutter I hate the most is my boys' schoolwork.  Right now my kitchen table is covered in piles of papers, notebooks, and sundry school supplies.  The end of the term is drawing near and the search is on for those assignments the knuckleheads didn't bother to pass in.  As soon as the term ends, the important papers (like reading logs, practice cards, etc.) will find a permanent home in our "school drawers" which is a plastic container with three drawers that hold 8.5 x 11 papers.  The rest of it will be put in folders in the closet in case we need them to study at the end of the year.
 
Anyway, one drawer a day.  While you are watching Rachel Ray. Or before you call it a day. 
Wow, I think I got carried away, but I really can't say. . . so. . .
 
Clean one drawer, OK? 

Friday, October 5, 2012

Halloween Vintage-Looking Feather Wreath


I went to Hobby Lobby today and I spent WAY too much. But I sure had fun!

I decided to make a large feather wreath for my large front door. The door is 42 inches wide, so it takes a large wreath to not be dwarfed by the expanse of wood. This weath frame is 24" across.

I started with a wire frame and 3 black feather boas. I used a hair clip to attach the boa to the frame. Nothing is permanent on the wreath, so next year I can totally rework it.I went to Hobby Lobby today and I spent WAY too much.  But I sure had fun! 

I decided to make a large feather wreath for my large front door. The door is 42 inches wide, so it takes a large wreath to not be dwarfed by the expanse of wood. This weath frame is 24" across.

I started with a wire frame and 3 black feather boas.  I used a hair clip to attach the boa to the frame.  Nothing is permanent on the wreath, so next year I can totally rework it.
 This next photo shows that I made it about 1/3 of the way around with a boa.  Don't wrap too tightly.  The feathers fluff out and look great.
 Here's the fully wrapped wreath.
 I used a pre-designed bouquet of flowers to add some color.  I wove the handle down into the frame and then secured it with some green floral wire.
 I laid out the rest of the elements that I wanted to add to the wreath.
 I used the floral wire to attach all the elements.  I had to wrap around the cat's ears which I wasn't very happy about, but it doesn't really show.  The funny thing is that the cat is so heavy that I had to hang the wreath off-center to make it hang correctly.
 Kinda cute, huh?

Sunday, September 9, 2012

Homemade Laundry Soap

 I have been reading about homemade laundry soap all over the place.  So. . . I just had to make some.  Here's my recipe which is based on Jillee's from OneGoodThingByJillee. She has lots of amazing recipes, so check it out!

 I used:
  •  one box of Super Washing Soda                $2.99
  •  one box of Borax                                        $3.99
  • 2 bars of Fels Naptha soap                          $  .99 each
  • 2 jars of faux oxi clean                                $1.00 each
  • 1 bottle of Unstoppables Scent Crystals     $6.99
So, basically $18 for the works.  It made a LOT of soap.

I used the grinder attachment of my food processor to shred the Fels Naptha soap.  It looked like shredded cheese!  There are a few pieces on the counter next to the bowl.  Then I used the chopper attachment to cut it into smaller pieces.

NOTE- I tried to pulverize the scent crystals into smaller pieces with my food processor, but it didn't work.  I wonder if my Magic Bullet would have done better?

I mixed ALL the ingredients into a garbage bag and swooshed it around until it was well-mixed.  Then I cut off one corner so that I could control the flow as I angled it into my containers.  There were little scoops with the oxygen cleaner, so I just use it to add one scoop into my washing machine's powder dispenser. 

 
I do a LOT of laundry and so far (one week) I have been pleased with this recipe.  Even the nasty, stinky wrestling clothes seem to be clean.  I would like a more highly scented recipe, but those crystals are expensive and I don't love the scent.  I wonder if I could used some essential oil or something.  Hmmm. . .

Anyway, give it a try.  If nothing else, you will feel like a homemaker extraordinaire!

Wednesday, August 29, 2012

Cute Chicken Coop

The new coop. . . complete with fake plants.  The chickens ate the real flowers!
 
I have chickens.  I actually should say that Little Papi has chickens.  We got them in March when they were tiny and fuzzy.  Now they are huge and beautiful.  Right now they are laying 4-6 eggs a day, but the best part is just having them around.  It makes me feel more grounded and self-reliant.  In a true emergency, we'd still have eggs.  And a stew if we got truly desperate.

Chickens are pretty hardy characters and are pretty easy to care for.  They need a coop or some shelter with roosts to keep them safe from predators at night.  They need laying boxes or they will lay eggs wherever THEY choose.  They need food, water, and room to scratch. 

This is the coop and the run. We keep food in one can and treats/supplies in the other.
 
There was no way that I was going to have some ugly ramshackle coop in my backyard.  I buit a smallish coop out of a large cabinet and the girls have lived in that for four months, but they needed something larger for winter.  I've looked at plans and made decisions about what I wanted, but I just never got around to building the coop. Last week I bought one!  PDog and his buddy, the WingMan brought it home for me  and the BandMan helped me paint and shingle it.  If you undertake a project like this, I strongly recommend that you own a pneumatic nailer/stapler.  It is a life saver!

A little ornamentation makes all the difference.  The wrought iron rooster on the coop was purchased at Hobby Lobby and then I used satin white Valspar paint to give it a happier look.  I love how it spruces up the coop and everyone exclaims about how cute it is.  The chicken sign on the run started with a piece of sheet metal that had holes in all four corners and the sides rolled over.  I bought it at Wooden Connections in American Fork.  I used paper to make the circle stencil and used Glossy Red Valspar spray paint to make the circle.  I used a chicken image that I found online, enlarged it, printed it in sections, taped it together, and cut it out to make the chicken stencil.  That was painted with Glossy Black spray paint by Valspar.  I used stainless steel zip ties that I found at WalMart to attach it to the fence becaust the sharp edges of the holes would have cut right through the plastic zip ties. 

All in al I highly recommend keeping chickens.  They are hilarious and worthwhile.  And my 14 Y.O. has a great sense of accomplishment from taking care of HIS chickens and selling the extra eggs to neighbors.

  The eggs.  Rinsed and labeled with the day they were laid.

Monday, August 27, 2012

Easily Separate Eggs

Believe it or not, this helpful hint is from Papa C. He saw it on TV, but I had never heard of this trick, so I thought I would share.  All you need to separate eggs is a water or 20 oz soda bottle. 

1. Crack the egg into a bowl.


2. Hold the bottle upside down and squeeze the air out of it.


3.  Place the bottle opening over the yolk and release the pressure on the bottle.  The egg yolk will be sucked up into the bottle.

 4.  Taa daa!  Let the extra whites run back into the bowl.
 
Check out our beautiful eggs!  We have some backyard chickens and 14 YO Little Papi takes care of them and gathers the eggs.  They are organic and partially free range.  He rinses and dates them to ensure freshness.  Yum!


Thursday, August 23, 2012

Late Summer Printable

I am ready to re-decorate, but since there's no holiday looming (I mean. . . how would one decorate for Labor Day?) I wasn't sure how to decorate.  I decided to go with a sunflowers look and I needed some subway art that reflected out lives right now.  If you enjoy the same aspects of late summer, please feel free to print and frame this subway art.  In a few days I will post a photo of my mantle.

Late Summer Printable

Wednesday, March 14, 2012

Console Table Makeover

I love KSL Classifieds. Before there was Pinterest, I spent a lot of time pouring through pages and pages of chairs, tables, and sundry other items. In the fall I spotted this table for $10 and I sent my DS1 to pick it up after his college classes.  

It is a pretty small table but it is perfect for my iHome and a few little decorations.  You can never have enough drawers, so even though this one is small, it is handy.

Last June my kids all changed rooms and we ended up having my youngest son's room left empty.  The hubby wanted to bash through the wass and turn it into a closet extension, but I claimed it for an office/studio.  I teach music lessons at home, so it is really nice to have a dedicated space.  More on the makeover of the room later. . . today, just the table.

I wanted the table to have a little pop, so I chose orange.  I have a great store nearby called The Painted Daisy Floral Shop and they carry Annie Sloan Chalk Paint.  This is a video of the owner.  She is a doll!  She was actually painting a table when I arrived at the store and she gave me a lesson right then and there.  I was sold and had a little splurge. . .

Just so you know, this table went from drab to fab in about 2 hours.  Here's what I did:

  1. I washed the table with a lightly soapy solution to be sure that there was no Pledge or other product clinging to the table and allowed it to dry.  This is Utah, so the drying time was minimal!
  2. I used a nice paint brush to apply a thin layer of the orange chalk paint over the entire table.  You do not have to sand or prime the table. 
  3. After about 30 minutes the table was dry, so I gave the table a second coat of paint.
  4. When the table was dry, I used a piece of a t-shirt to apply the Annie Sloan Clear Soft Wax to the entire table.
  5. The I used a sanding block to distress a few edges.  I did not want a seriously shabby look- just a happily worn look.
  6. I then used a tiny piece of a T-shirt to apply a bit of the Annie Sloan Dark Soft Wax to add some aging on the edges and aroud the knob hole.  If the dark is too dark, you can use some more clear wax as an eraser.  But. . . you do need to work fairly quickly.
  7. Let the table sit for 15-20 minutes.  Then buff with a clean piece of t-shirt.
  8. Add a cute new knob (I love Hobby Lobby for knobs, and voila!  A whole new look! 

Sorry.  I didn't take process photos.  It had been a VERY bad day and this project was very cathartic.  Taking photos would have ruined the flow of the experience.

Tuesday, March 13, 2012

Spiffy Irish Dog Collars

I am the proud owner of two Irish Water Spaniels.  They are medium-sized dogs who resemble a Standard Poodle but they have long whip tails and webbed feet for swimming.  My boys are 4 1/2 years old and they are somewhat ill-behaved in public, but angels at home with us.  Since this is "their" week, I thought they needed new collars for St. Patrick's Day.
Lewis and Clark sporting their new collars.  Lewis is on the left in the lime collar and Clark has the kelly green collar.  Lewie had to have his ears trimmed after a bad run in with burdocks, but I think he's cute anyway!  The intense looks are the result of me holding a few treats!

I used:
  • 3/4" nylon webbing- about 24 inches (some loss and some doubling) for a 16" collar
  • 3/4" ribbon- about 24"
  • 3/4" clicking buckle
  • 1 3/4" D ring

Make sure that when you cut the nylon webbing you fise the ends by swiping it through a flame.  I just turn on my gas burner and pass it through the flame for a couple of seconds.  Fold the end of the ribbon over and prepare to sew.


Sew along the edge of the ribbon to connect the ribbon to the webbing.  When you get to the end, turn it around and sew back down the other side.

This is how it will look.  I used black thread so that it would show up.  Plus. . . that's what was in my machine and I was feeling lazy.


Thread the ribbon up through one opening. . .

And down through the other opening.

You will want to have an overlap of 3-4 inches.

Sew a straight line across the collar.  You may need to hold the buckle down.  Use the reverse button and go over the seam 4-5 times.

Slide the D ring in between the main collar and the little tab and then sew another straight seam.  I like to put an X at the end of the tab to make sure that the D ring will be secure.  Lewis and Clark can pull pretty hard.

This shows the X.  I apologize for the crappy sewing.  No excuses, just going too fast!

On the other end of the collar, slip on the otherpart of the buckle.  Make sure that you measure the collar on your pup's neck before you start sewing.  It should be loose enough to slip your fingers under it, but not so loose that it could slide off the head.  A panic-stricken dog can easily get out of a collar.


Here's the fruits of 20 minute of work!  Big Lew's collar is a little longer than Clark's.  Aren't they festive?  My teenage boys thought they were a little "gay."  I threatened rainbow collars for April and then they thought these were lovely!