Background

Tuesday, February 11, 2014

Dealing with Digital Images Part 3


I have at least 30 boxes of old photos in my house.  Most of them are jumbled in no particular order as they were collected when moving older relatives.  I feel a great responsibility in being the caretaker of this family history.  If you are familiar with older photos, you know that some are yellow looking, some seem to be cracking or peeling, and others are so brittle that they are falling apart.  These conditions are all due to the chemicals used in the development process and in the paper.  There is no way to reverse these processes, so the best way to save the image is to scan it and make it into a digital image.  There are many ways to accomplish this:

  • Many people (including me) have a 3-in-1 or 4-in-1 printer that has a scanning bed.  Make sure that the glass is clean to avoid spots and then scan the photo.  If you are given a choice about quality, always choose the highest.  Image quality is described as "dots per inch" or DPI.  You want at least a 300 DPI.  600 DPI is my choice if I have the option.
  • You can hire someone who owns a high speed scanner or rent the scanner.  If you are interested in this option, I recommend looking for an Heritage Makers consultant in your area.  Many own these high speed scanners.  There is usually a per image charge of about $.29.  I had the opportunity to rent a scanner a few years ago and scanned over a thousand photos for just $50.00.  I wish I had done a lot more!
  • There are companies everywhere that will scan photos.  ScanCafe is one such business where you can mail them your photos and they will digitize them.  Although they have better pricing if you are scanning large quantities, you have to balance the risk of putting your photos in the mail.  Look in your area for a local scanning company before you ship your photos away.
  • For large photos you may have good success with making a photograph of it.  You will have to adjust your camera's settings until you get a usable image.   
Once you have your photos digitized, you need to organize them in a similar manner to your digital photos.  This is much more difficult with older photos that were scanned in no particular order, but you can set up folders by decades and drag and drop the photos one at a time into the folders.  It may help to also label the family name such as "Foster 1950s".  You may choose to label the photos by name such as "Gram Collins ". If you have a lot of time you could rename the files to indicate who is in the photo.  Future generations will know even less than you do, so save what you know.  Labeling is important!

Once your photos are organized, you need to DO something with them.  The simplest thing is to print the photos and display them in frames, but that can turn into clutter in a hurry.  Canvases have become very popular of late and that is a great way to preserve a really special photo.

You may choose to make scrapbooks- either using traditional paper methods or digital scrapbooking methods.  One of my favorite techniques is to drop the photos into a pre-made book template.  Shutterfly and Costco make books at great prices, although I have heard complaints about the quality of the books.  I use Heritage Makers.  There are thousands of templates so that each book can have its own "feel."  I have made books about trips, individual people, family recipes, and year in review retrospectives.   

Since digital files are so easy to share, make sure that you share with your family.  Since there may only be one photo of great-great grandpa, make sure that everyone has a copy!  You can use CDs to share photos, but caution family members to back them up in safer methods.

Dealing with Digital Images Part 2

This is a really important topic and there are lots of good ways to deal with your photos, but in my experience most people don't do any of them.  My opinion is that my photos are priceless, so it is worth it to me to invest in the products and services that will protect them.  

Burning your photos to a CD is NOT RECOMMENDED!  CDs deteriorate over time and can be completely worthless in as little as five years.  If they get scratched or damaged, your data is GONE.  Do not use CDs except to share photos.  They are not a storage device.

If you have downloaded your photos, they are saved on your hard drive.  Although a hard drive is a great thing, they do break down and that can be catastrophic if you don’t have a back up.  You need to have at least one method of back up and I would suggest two or three. Here are some ideas for back ups:
  •  Add another drive to your computer.  I have two drives in mine and I save my current photos on both. 
  • Use an external hard drive.  These usually look like a small black box and all they do is serve as memory.  You can get a Terrabyte of memory for under $100 on Amazon.  For most people this will save several years of photos.  You can set up your computer to automatically update your external hard drive or you can manually save to it on a regular basis.  (Note: These new viruses and malware that have been going around recently don’t only attack your computer- they attack anything attached to it, so that could put your EHD at risk.)  I have no problems with thumb drives- as long as you have a safe place to keep them.  It might be a great idea to keep a set of thumb drives or EHD off site in case of a fire or flood.  If you are a “mad photographer” like I am, the thumb drives would cost a LOT more than a good EHD.
  •  Subscribe to an automatic online back-up service such as Mozy or Carbonite.  These companies can make automatic back-ups of your computer on a regular basis (nightly, weekly).  Although these services can be expensive, they are also wonderful when your computer crashes because it is very easy to download the missing files from the company and they work on a schedule so you don’t have to remember to do anything.  Mozy has been a lifesaver for me in the past and one of my friends swears by Carbonite.  There are some new providers in this category but I have no experience with them.
  • Use an online photo service to organize and save your photos.  Flickr, Picasa, and Shutterfly are popular sites.  As long as you upload your photos to the cloud right away, you will have a safe back up that you can also set up to be shared with those people you choose.  You need to make sure that you can download full-resolution images from the site if you are using it as a back up.  I upload my “commercial” photos to SmugMug.  It is a little more difficult to navigate than the others, but it also gives me greater control for a reasonable price.
  •  If you don’t care about having “Photo” type options and you just need to save the files, you might want to look into sites like Dropbox, GoogleDrive, or SkyDrive
My recommendations:
  • If you are lazy or forgetful and you are pretty sure that you won’t remember to back up, you should use an automatic on-line back up service.  At least once a year you should copy all your photos to an external hard drive. 
  • If you are pretty organized, schedule one day a month to upload photos to an online site and transfer them to your EHD.  Do NOT delete the photos off your photo card until they are backed up and do NOT keep your EHD attached to the computer.
  • If you are a maven of organization, do it all at the same time.  Download photos to your hard drive, copy them to an EHD (that does not stay plugged in), and upload them to a cloud storage site.  Once they are asved in three places, you are probably safe.

I tend to be in the middle category because I have to edit my photos, so I make sure that I have back ups of the originals during the editing process.  Last summer I lost the originals of a wedding.  Once burned, twice shy.

NOTE:  When you are transferring photos, make sure that you COPY them to the new location.  Do NOT use a CUT and PASTE technique.  You can go back and delete them later if you want to- AFTER you make sure that they are where they are supposed to be!

Tomorrow I'll cover how to deal with old photos and give you some ideas about how to get your photos off the computer and into your life!


Dealing with Digital Images Part 1

A good friend of mine had a glitch the other day while moving around some digital photos and lost them.  That is just about the worst feeling in the world!  These days we are all using digital cameras.  We have photos on our phones.  But apparently not everyone knows what to do next. I keep hearing about people just keep buying more memory cards because they are afraid to download their photos!  Pictures are no fun when they are on a memory card.  They need to be displayed and seen! 

I am pretty passionate about photography and memory keeping.  I come from families that took LOTS of photos.  Now that I am the guardian of all the family photos I have a whole room in my basement filled with boxes of loose photos and photo albums.  Although these are a treasure trove of memories, they take up a lot of space, they are hard to enjoy, and they are hard to share.  Now we have all gone digital.  I take a couple thousand photos a month with my Canon 7D.  I also have a Canon Power Shot that I carry when I need to just grab a couple of snapshots.  And then there is the phone.  Sometimes my iPhone is the only camera available to take a photo of a really important moment.

So. . . how do we deal with all these photos?  What is the best way to preserve our memories?

This three part series will cover Downloading and Organizing Your Digital Photos, Storing and Backing Up Your Digital Photos, and Preserving Old Family Photos/Using your Photos.  For the sake of this tutorial I will assume that you are using a Windows based computer and that you are just taking regular old photos (not RAW).

The Download

Your computer may have a slot where you can insert your memory card and download the photos to your hard drive.

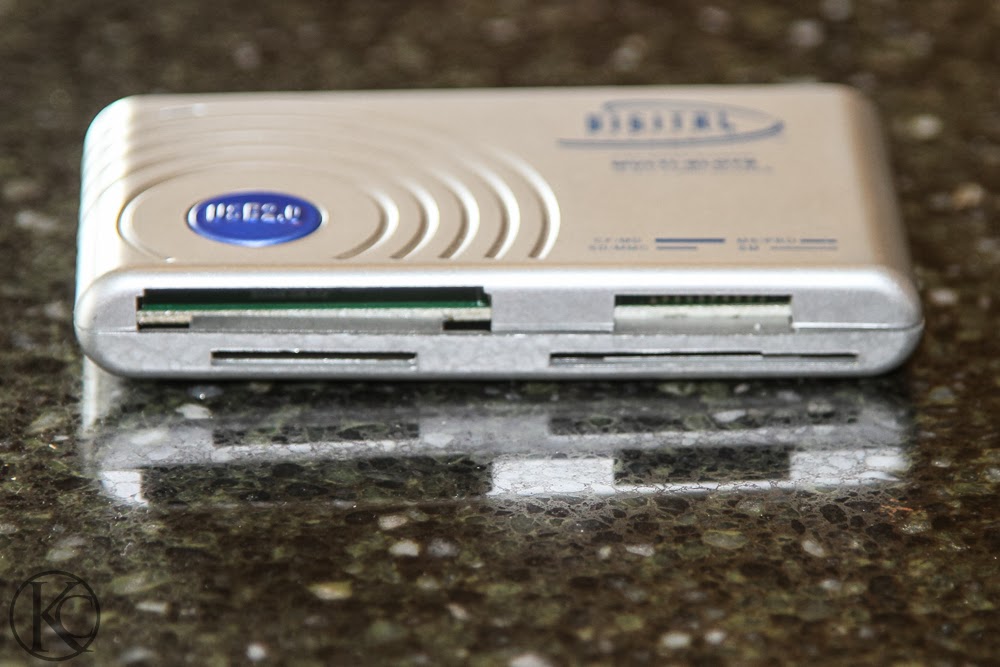
If not, you need to purchase a card reader.  The photo below is the one I use. 
I need to read CF cards and SD cards so this one is perfect for me.  They are inexpensive (under $20) and they use a USB port to attach to your computer.  As soon as you attach to the computer you will probably have a box pop up asking what you want to do.  If not, you can click on the Start Button (the circle in the lower left hand corner), then on Computer, and then find the drive that you are using.  Mine show up under hard drives or removable storage.  Click on that icon and then you will be able to transfer the photos. 
If you can plug your phone into your computer, it will usually prompt you to make a file of your photos.  You should do this every few months.  Otherwise, you will need to e-mail your photos to yourself to get them onto your computer so that you can save them.  This will take a lot longer, but if the photos are good, it is worth it.

Organizing Your Photos

It doesn’t really matter HOW you organize your photos as long as you are consistent.  I have always organized my photos by date.  I make a folder for the year and then a folder for each month.  A trick to naming these folders is to use the number of the month, for example “1 January 2014”, “2 February 2014”.  The reason that I do this is that it keeps the months in order.  If you just use the name of the month, the computer will arrange them alphabetically.  Inside those month folders I have event folders that tell me what the photos are, such as “Colby Graduation” or “Trip to Maine”.  This system has worked very well for me for many years.  Even if there were two events on the same day, I will generally separate the photos into different event folders- not just by date. 

NOTE- If you have a photo editing program such as Adobe’s Lightroom, you need to make sure that you understand how to use the program to organize your photos and you should always move photos INSIDE the program so that you don’t lose links.

My organizational tree would looks something like this:
         2013
              1 January 2013
                        New Year’s Day
                        WrestlingAF
                        Lewis and Clark
                        Birthday Party
             2 February 2013
                        Tibble Fork

                        Valentines

Come back tomorrow for Part Two: Storing and Backing Up Your Photos

Monday, February 10, 2014

Sweet Valentine's Day Printable

I have decided to really tone down my decorating in 2014.  We have had a rough run for a few months- including me having a hernia surgery a couple of weeks before Christmas.  That experience helped me realize that my family does not really care if the house is decorated- they only care about the decorations that have become a tradition.  For us that is a Christmas Tree and lights in the windows for the whole holiday season.  So. . . despite the fact that I have a whole tub of valentine decorations in the garage, I'm sticking to one printable that I can slide into my chalkboard display stand.  The best part?  I can change it out easily for each holiday so that I don't feel like a total Scrooge!

This printable is sized for a normal piece of paper 8.5" x 11".